Repairing Content
Image Restoration, De-Noising, & Upscaling
There are a ton of image restoration tools, especially now that we can clean up old images using tools that are built into Photoshop. Sometimes you still need a finer touch, especially for video clean up. These are some of those tools.
The Secret Sauce
When you do image restoration, you’ll almost certainly end up with something that looks too smooth and a little too AI-looking. Even though you’ve just removed noise, you now should add some noise and texturing back in. After Effects has some great built-in grain and noise tools, but Red Giant’s suite of color tools is what you really want to use. No matter how you execute your solution, the end result will look better and is more sellable when you add a little realistic grime back in. The jam is to over-do the clean up and then dial it back with some artistic license. Counter-intuitive.
Video Stabilization Trick
I’m giving away a good one here. If your footage is pretty gnarly and shaky and warp stabilization vanilla style doesn’t work great in Premiere or After Effects, you can bring that footage into a tool like Topaz and slow the footage way down with some AI tools (sometimes up-rez too). Once the video is slowed way down, you apply warp stabilization in AE/PR until you get it to a point that is acceptable. This requires a lot of levers and pulleys; which slow-motion model, what target frame rate, what setting for warp stabilization etc. When you get the video to a point of acceptance, speed that sucker back up to the original frame rate. If you have any resulting flicker, try using something like Digital Anarchy’s Flicker Free slow motion mode to make it less bad.
Recommended Tools
Neat Video
Neat Video is a noise, flicker, and image restoration tool that works within Premiere and After Effects. It’s incredible and worth every penny. Best in class for noise reduction. Running too slow? Open up the plug-in and click on settings, launch the performance tab, and watch the plug-in’s efficiency go from 2 to 11. Very important steps to take as it doesn’t do this automatically.
BorisFX Continuum
In addition to a sweet package of visual effects (Sapphire), this Boston based company behind Mocha also produces a suite of image restoration tools. Things like: gradient repair, noise removal, image debanding, etc. Absolutely worth the $37 / month when you need it.
Topaz
Topaz has a suite of tools for up-rez, adding in frames for faux slow motion, and de-noise. Pretty great software. Highly recommended. They are the best in class for up-rez and faux slow in my opinion. Video Ai is the one that I’ve used the most. It’s helped me up-rez VHS and BETA-MAX videos and it’s done a pretty good job at that. I’ve also used it for stabilization and adding in frames for faux slow. Topaz also regularly updates their products so there’s constant improvement. Be warned though: even on a zippy-as-hell computer, you’re going to be doing a lot of waiting.
Thankfully, Topaz doesn’t do a “subscription” model. Instead, you buy it and get 1 year of upgrades. When the year has expired, you can continue to use the most recent update in your previous upgrade cycle – and when you want a new version, you just pay for another year of upgrades. This is probably my favorite model for software that is constantly changing. Very fair.
Gradient Banding
Lots of content has gradients. Gradients in moving images can sometimes cause banding in your image. This is particularly evident in compressed files like MP4s. Unfortunately, this is a garbage-in, garbage-out process; if your source content has banding, you either have to figure out how to get rid of it, or you need to disguise it. And that’s to-taste. There isn’t a magic pill here.
When The Banding Is In Your Source
Ideally the footage you start with doesn’t have banding, but it often shows up in stock video. Banding is almost always related to
compression and/or color bits-per-channel.
While you can’t always get rid of all banding, you can remove most of it and then disguise it.
There isn’t a one size-fits-all approach here. Here are some techniques I’ve used over the years and have tested with some of the
sample footage we’ve been working with:
- Color correction - sometimes just some tweaks in Lumetri will make banding disappear.
- Neat Video Reduce Noise - Love this plugin - really good at removing noise and also is pretty good with removing
bands. - Boris FX De-Band - Another great plugin that does exactly what is says.
- Topaz - Enhancement - Theia settings. Mess around with all these until you get something good enough.
Once you’ve hit a happy medium, you can disguise whatever banding remains with a little grain or noise - just be careful and apply it to-taste. In general a workflow of Neat Video → Boris De-Band → Lumetri → A little noise or grain is usually pretty decent.
When You Cause The Banding In Your Export
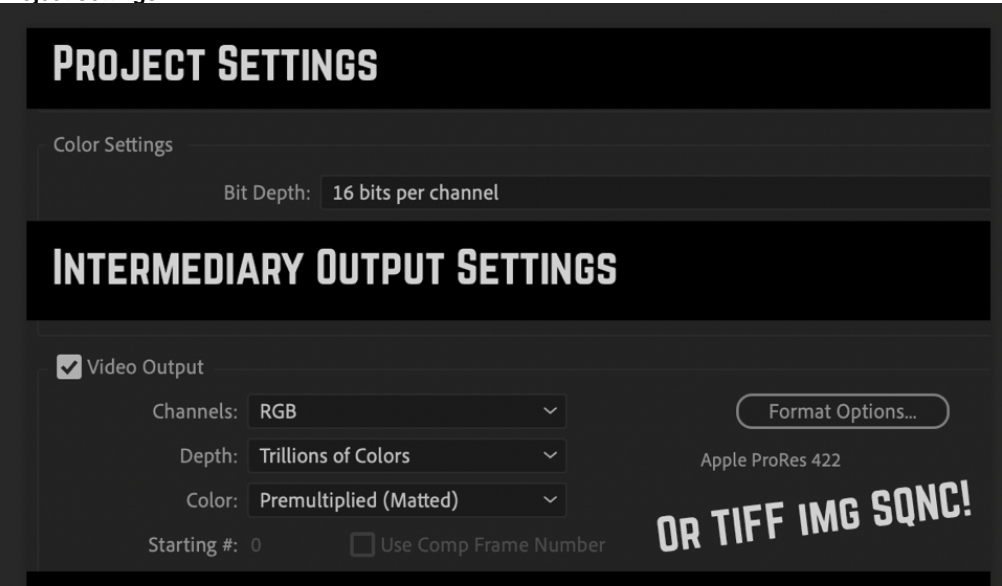
The secret sauce with this is making sure you’re working inside a project that is set to 16 bits per channel (16BPC). When you export, even if your delivery codec is (usually) only 8bpc (HAP, Mp4, etc) or 10bpc (notchLC), you’re way less likely to have any banding. If things still look messy, set your exporter to Trillions of Colors. This doesn’t solve banding from source, but it will help to solve banding that appears as a surprise in your export.
|
|
|
Make sure that you’re rendering content directly out of After Effects at the end of the chain (not AME), and you are exporting a codec that allows for trillions of colors. 422 / 4444 / TIFF uncompressed can all do this. So you're working in 16bpc, then rendering 16bpc (“trillions of colors”) and that is being interpreted to 10bpc or 12bpc. Confused yet?
Rendering FYI: AE renders uncompressed 16bpc TIFF sequences much faster than 16bpc PNG (on M1 and Mac Intel). TIFF has a way bigger footprint wise but renders at a factor of 20:1 out of AE. Converting to PNG in AME from the TIFF is a no go as it will convert to 8bpc and you’ll get nasty gradients again. Converting through something like Bridge takes at least as long as the straight render from AE to PNG. |
Even when you’re exporting an APR 4444 file, you might still see some banding. You can solve this by adding noise or dithering to the gradients and it’ll make a difference – but it is a trial and error process. Try finding a few seconds that show banding on export and tweak those few seconds until the banding is gone. Then, apply those settings to the entire duration.
Alternatively, you can export with as little compression as possible (AIC or QTRLE) and then transcode to something like HAPr, which does a great job compressing gradients!
Are Your Sure It's Not The Media Player?
Sometimes banding can be caused by how a media player interprets video. Does the final codec MP4 appear clean in Quicktime, but the same file looks terrible on a Brightsign? Time to disguise the banding with some noise, or try a different final codec. Also, go ahead and check the color settings on the display or projector.
Or the Software?
TouchDesigner, After Effects, MadMapper all interpret color differently – even if you match color settings!