Projectors
- Projection Overview
- Lens Types
- Projector Manufacturers
- How To Draw a Projector Frustum
- Projector Math
- Projector Positioning
- Projector Rigging & Hardware
- Projector Troubleshooting
- Projection Surfaces
- Projector Mounting Explainer
Projection Overview
Overview
In this section, you’ll learn all about projection:
-
Projector Classification : what’s good for what?
-
Projector Lenses : defining throw ratios and the positive / negative of lens types
-
Projector Manufacturers
-
Projector Rigging & Hardware
-
Projector Math : there are a bunch of formulas
-
Projector Positioning : where does the projector go based on what I want to light up?
-
Projector Drafting : how to draw a frustum
-
Projector Troubleshooting : how to fix some basic run-of-the-mill problems
-
Projection Mapping
Projector Technology Classifications
History & Types: Projectors have evolved from 35mm, slide, and overhead projectors to digital models used in various settings.
Digital Projector Technologies: Key types include DLP, LCD, LED, and LCoS, each with unique features and pros/cons.
Key Projector Technologies:
-
DLP (Digital Light Processing)
-
Uses microscopic mirrors and a spinning color wheel.
-
Types: Single-chip, three-chip, 4K, short-throw, portable, and interactive DLP projectors.
-
Pros: High image quality, color accuracy, minimal motion blur, fast response time, durability, low maintenance.
-
Cons: Limited brightness, rainbow effect, limited color gamut, color wheel replacement, limited zoom and lens shift.
-
-
LCD (Liquid Crystal Display)
-
Utilizes three LCD panels for color blending.
-
Types: Home theater, business, portable, short-throw, and interactive LCD projectors.
-
Pros: Bright images, good color accuracy, excellent black levels, quiet operation, high light output, minimal rainbow artifacts.
-
Cons: Potential motion blur, lower contrast ratio, limited color gamut, image distortion, limited zoom and lens shift.
-
-
LED (Light Emitting Diode)
-
Based on either DLP or LCD technology but uses LED as a light source.
-
Types: Pico, pocket, portable, and short-throw LED projectors.
-
Pros: Long life (20,000+ hours), energy-efficient, bright colors, minimal maintenance.
-
Cons: Higher initial cost, limited zoom and lens shift, may lack 3D support.
-
-
LCoS (Liquid Crystal on Silicon)
-
A hybrid between LCD and DLP, uses liquid crystal chips with reflective backing.
-
Types: 4K, 3D-enabled, high-end, interactive, and business LCoS projectors.
-
Pros: Superb image quality, excellent contrast, deep blacks, high resolution.
-
Cons: Heavy, higher price, potential motion blur, limited rainbow artifacts.
-
Projector Hardware
In general when you see a “K” after a number when talking about projections - it is referring to the brightness-Lumens in the thousands. So 5k = 5000 Lumens. This is not referring to color temperature or resolution. That said you might get a model name like 4k32 which means 4k resolution, 32k lumens. Confusing! (If you see 4k30 or 4k60 in a spec, this may refer to 30 or 60 fps, not lumens!, extra confusing!)
Projector Size Classifications
-
Pico - mini projectors. Usually less than 500 lumens, but can be found up to 1k lumens. Fixed lens with variable focus.
-
Classroom - What you might find in a classroomclass room or your apartment. Usually <5k. Fixed or zoom lens with variable focus.
-
Installation - What you might find in a museum or your rich friend’s screening room. Usually <15k.. Interchangeable lenses of all kinds.
-
Cinema - What you might find in a movie theater, music venue, or large scale projection mapping. Usually >15k. Interchangeable lenses of all kinds.
-
Moving Head Projectors - A specialty projector that is mounted on a moving head servo, allowing for physical motion (pan, tilt, twist) of the projectors output.
Projector Throw
Projector throw is the ratio between distance of the projector to the target surface and the width of the projected image at that distance. The example I always give is with a 1920x1080 projector, your aspect ratio is 16:9. If we want to project an image that is 16’ wide by 9’ tall, and our lens has a throw ratio of .5:1, we need the projector to be 8’ away from the target surface: 16’ multiplied by .5 is 8’!
Throw Distance = Target PRJ Width x Throw Ratio
See more throw formulas here.
Projector Lenses
There are a ton of different types of lenses. Different executions require different solutions.
Projector lenses, like camera lenses, arelenses are either interchangeable (you can change the lens on the projector body) or fixed (you can’t change the lens). Fixed can also define whether a lens has zoom capabilities or not.
In addition to their throw ratio, here are some lens property variables:
-
Interchangeable or Fixed
-
Zoom: Variable or Fixed
-
Throw Categories: UST (Ultra-Short Throw), ST (Short-Throw), Medium, or Long Throw
-
Mirrored or non-mirrored
-
Lens Shift or None
-
Percentage Vertical Shift
-
Percentage Horizontal Shift
-
-
Frustum/ Lens Cone type - this is the “0 position” of a lens versus the target surface. The home position of the lens is when there’s no lens shift capabilities or the lens isn’t shifted.
-
Spherical Lenses - Specialized lenses (180 -270 degree throw) these projectors are used in planetariums, amusement park rides, and smaller dome projections.
Lens Types
Ultra Short Throw Lenses
Usually a throw less than .4:1 is considered an UST.
Classic UST lenses are mirrored, shoot from the back of the projector, and have complex offsets that are calculated with exponential formulas. Mirrored lenses on projectors with interchangeable lenses are often called “hammerheads” because they look like hammerhead sharks. There also isn’t a rounded lens diaphragm; instead there is a small rectangle. I would never use a hammerhead UST in a multi-surface projection mapping scenario – the distortion and focus falloff is aggressive.
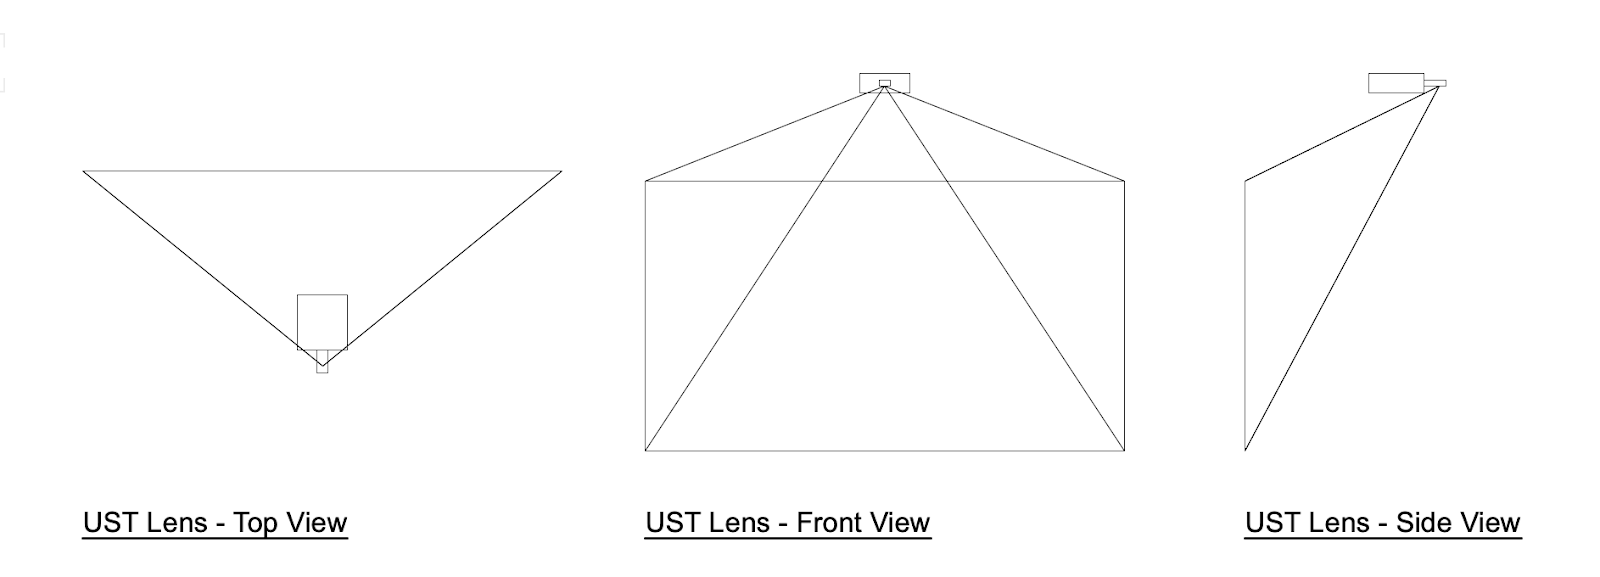
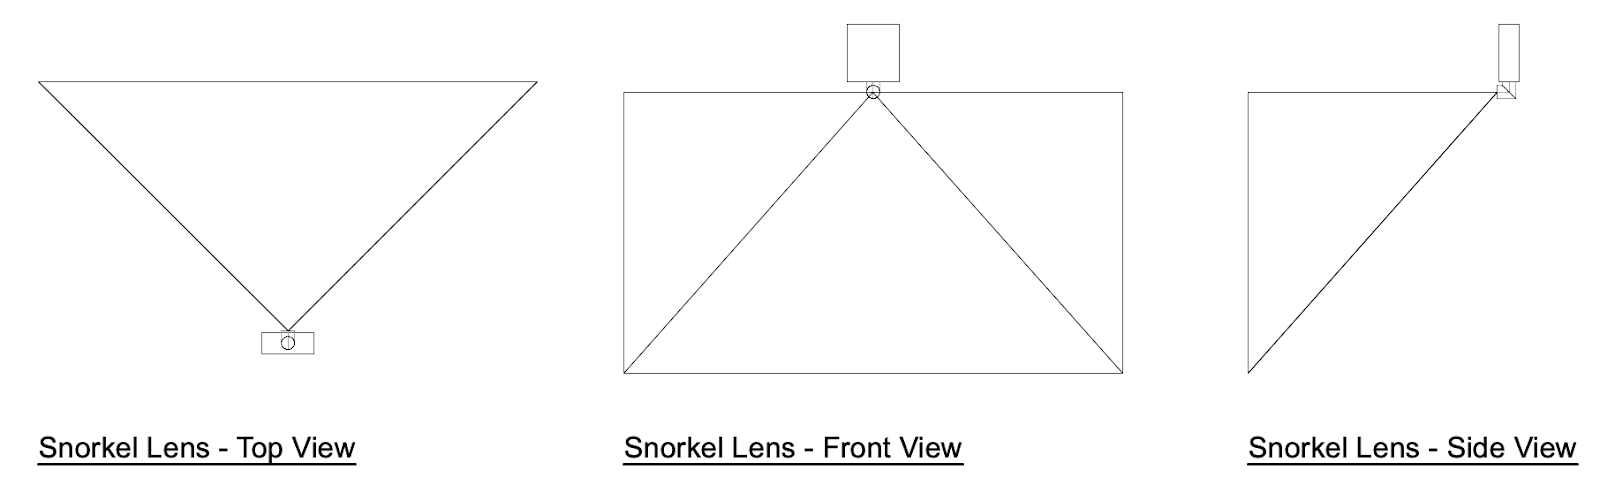
Later, a newer UST lens was developed that shoots at a 90° angle, this is called a “snorkel” because it peaks below the projector chassis in certain configurations. It has a normal lens diaphragm. This lens is superior because it can shoot with 0 offset and the math is a lot less difficult. Also, the distortion is a lot better and can be used for mapping fairly reliably. Epson has a version of this lens that is fixed at 180°, whereas Panasonic and Barco’s version shoot at 90° and can rotate in 90° increments when you adjust the lens collar. Snorkel lenses are kind of in their own category because they sometimes have zoom, they often have a good shift range, and their throw ratio is sometimes categorized as Short Throw and Ultra Short Throw
Traditional / Normal Optics Lenses
-
Short Throw Lenses - usually a throw less than 1.5:1 is considered ST. Optoma has a projector line of .5:1 non-interchangeable lenses. These are fantastic little workhorses, with a fixed offset.
-
Medium Throw Lenses - usually less than 4:1
-
Long Throw Lenses - usually greater than 4:1

Why is this projector at the top of the image field? Learn about offset here.
Projector Manufacturers
Optoma
Great, inexpensive, projectors. Never used anything of theirs above classroom range, but I’ve always been happy with them. Particularly the GT1080 (unfortunate name) and all of its children.
BenQ
Great slightly more expensive projectors. Ditto re: projector types.
Epson
Even more expensive. Have used all types and: very reliable, except for color matching but that’s a problem with a lot of (all?) LASER projectors. Generally speaking - Epsons have great projector black. Also, their latest 4k lineup (as of 2024) is the sharpest pixel shift I’ve ever seen. Price point is incredible.
Panasonic
Even more expensive. All types. Ditto re: color. Latest version of 4k pixel shift is not as good as previous generations (2023). Really good projector blacks
Christie
Even more. All types. Have used this brand the least. Though have spent an intensive 10 days with 29 of their Gryffin 50ks and they are pretty good (except their black match). They are considered to be the best by many 🤷♀️
Barco
Even more. All types. Projector black matching on higher end models but must be on a flat plane with straight blends (as of 2022, hoping this changes). Hire me if you want to learn! Their color loss and color bugs are really terrible on their lasers and they are infamous for this problem. Particularly the UDM-4k22 model. That said, it excels against some competitors who have even worse gremlins.
How To Draw a Projector Frustum
In order to get started drawing a frustum, you need the following information:
-
Projector Lens Throw Ratio
-
Projector Lens Cone Type
-
Projector Target Coverage (or sample coverage, will explain below).
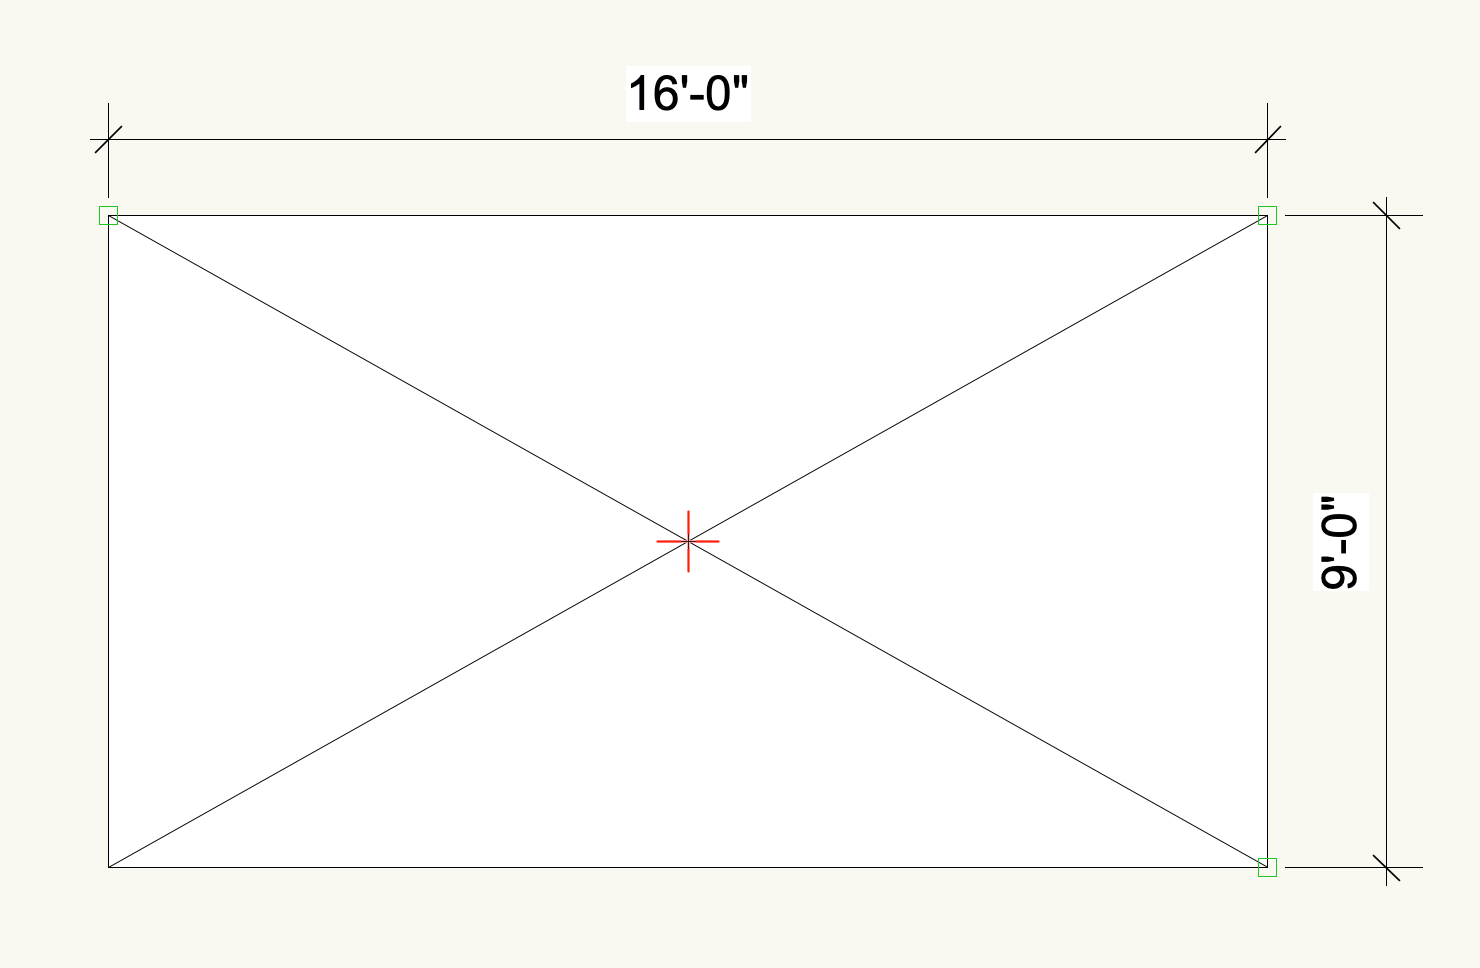
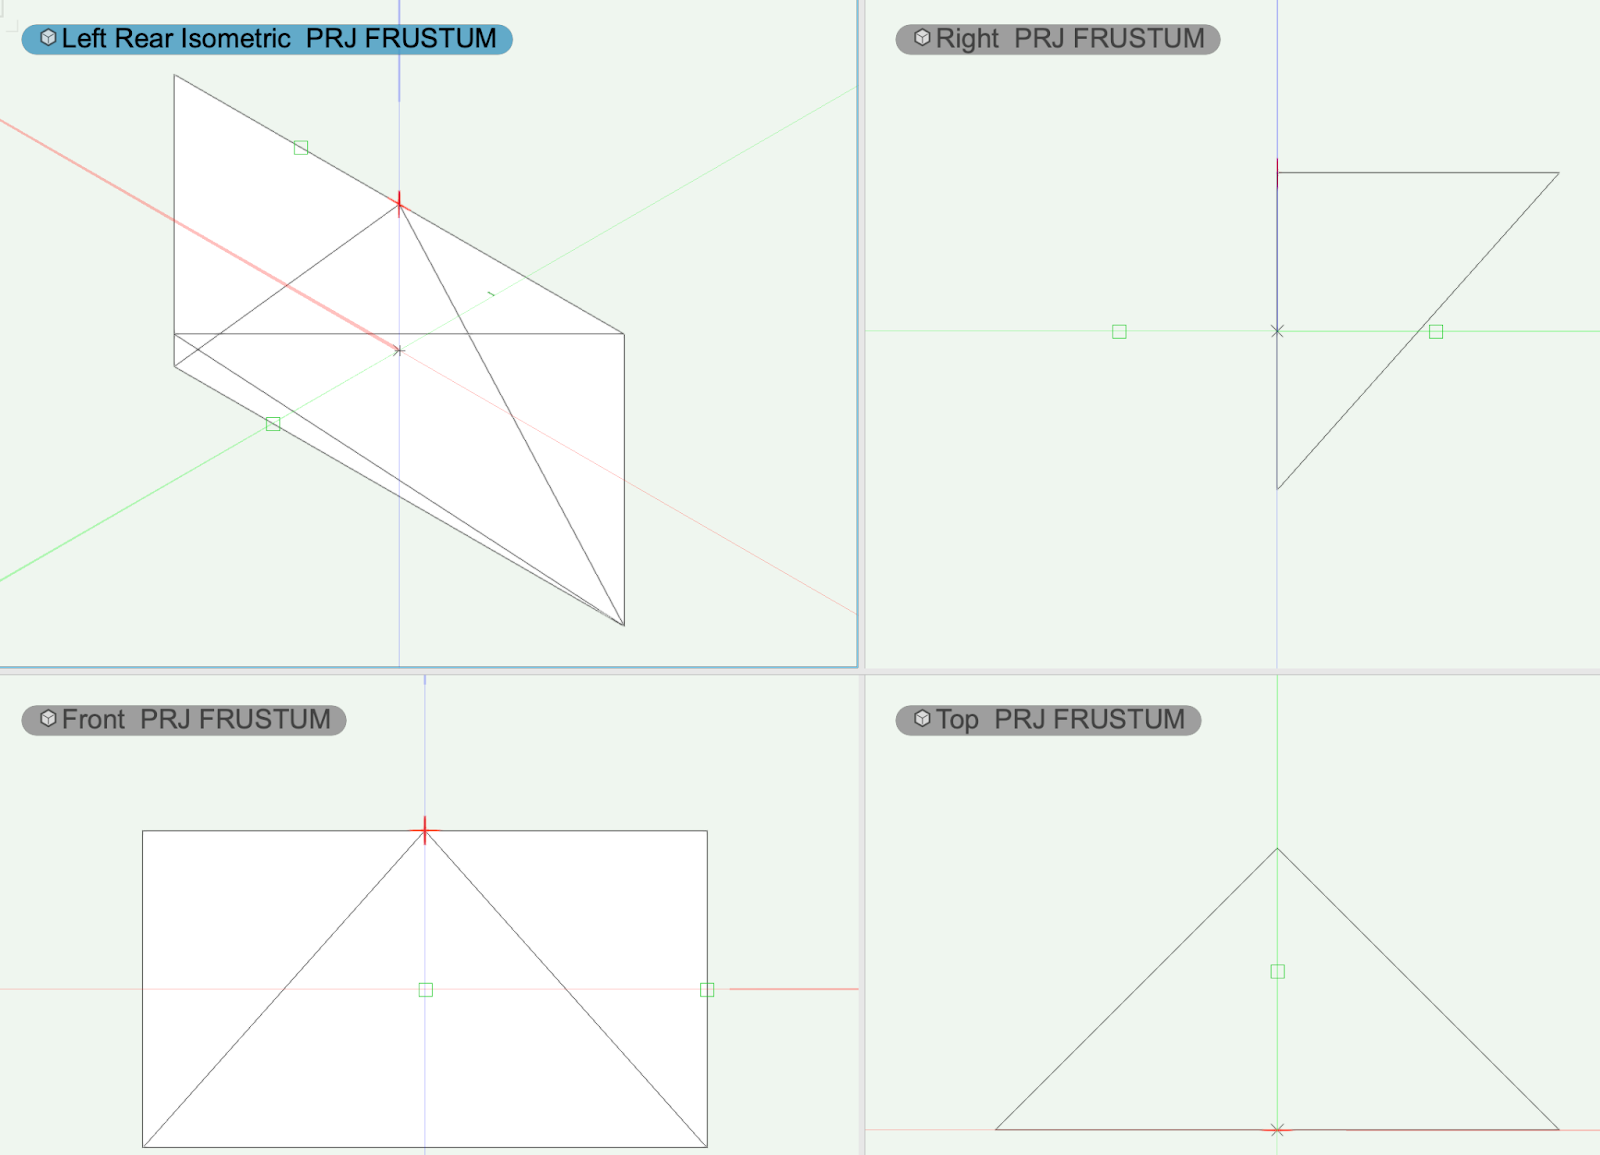
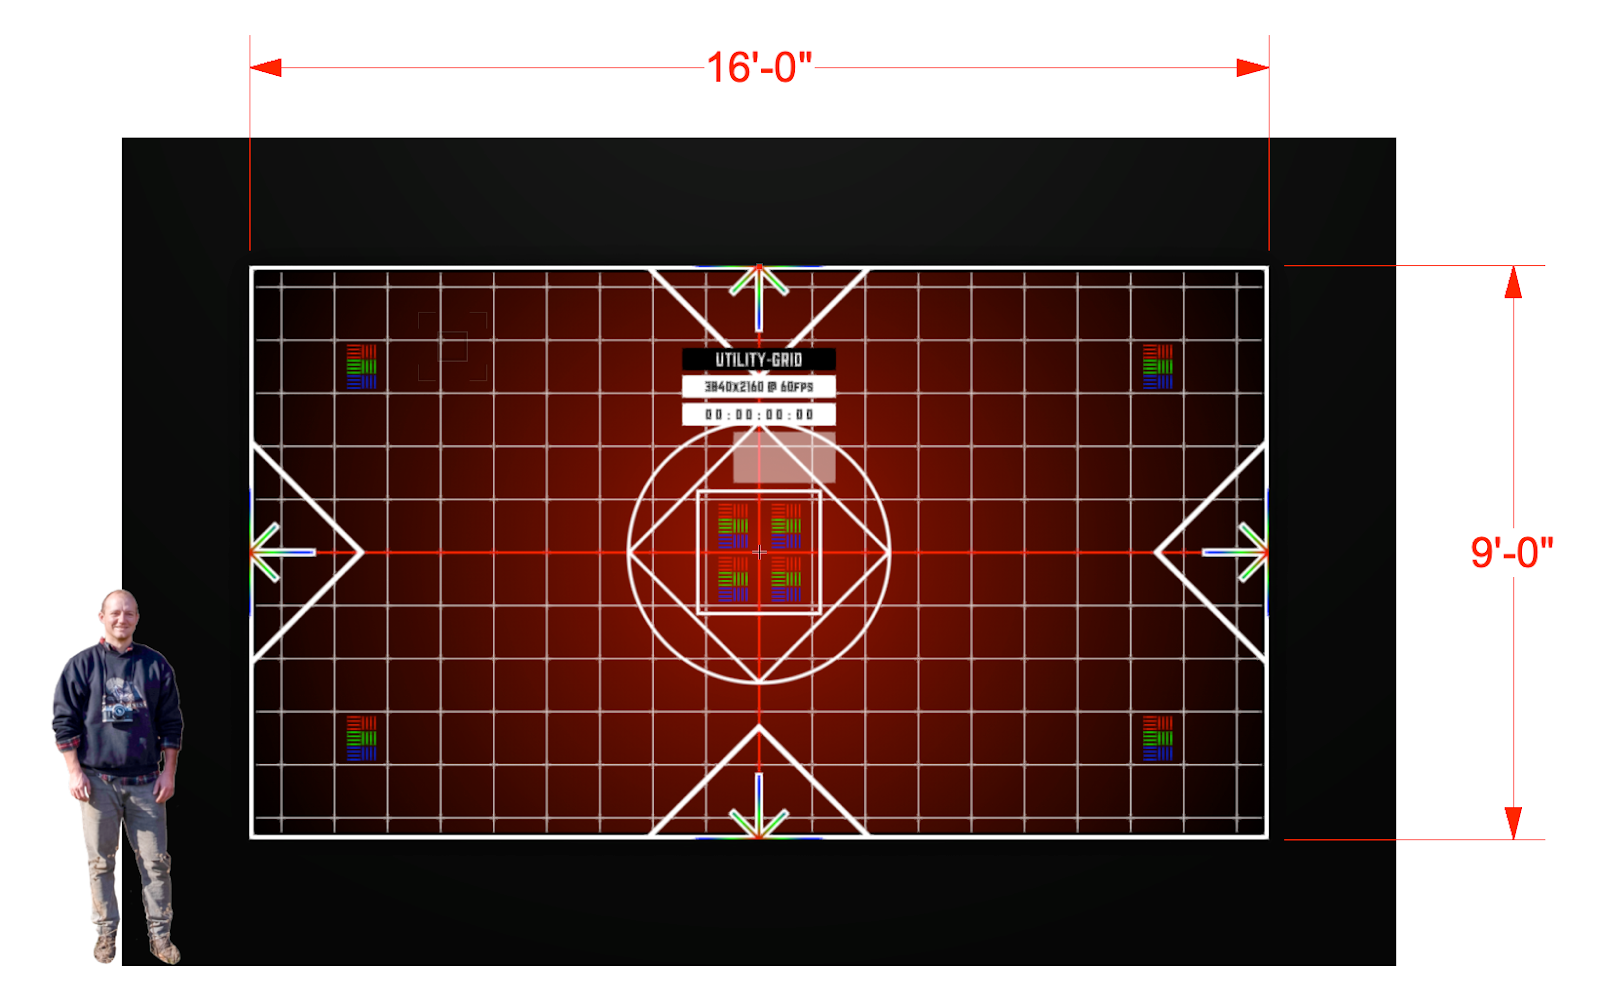
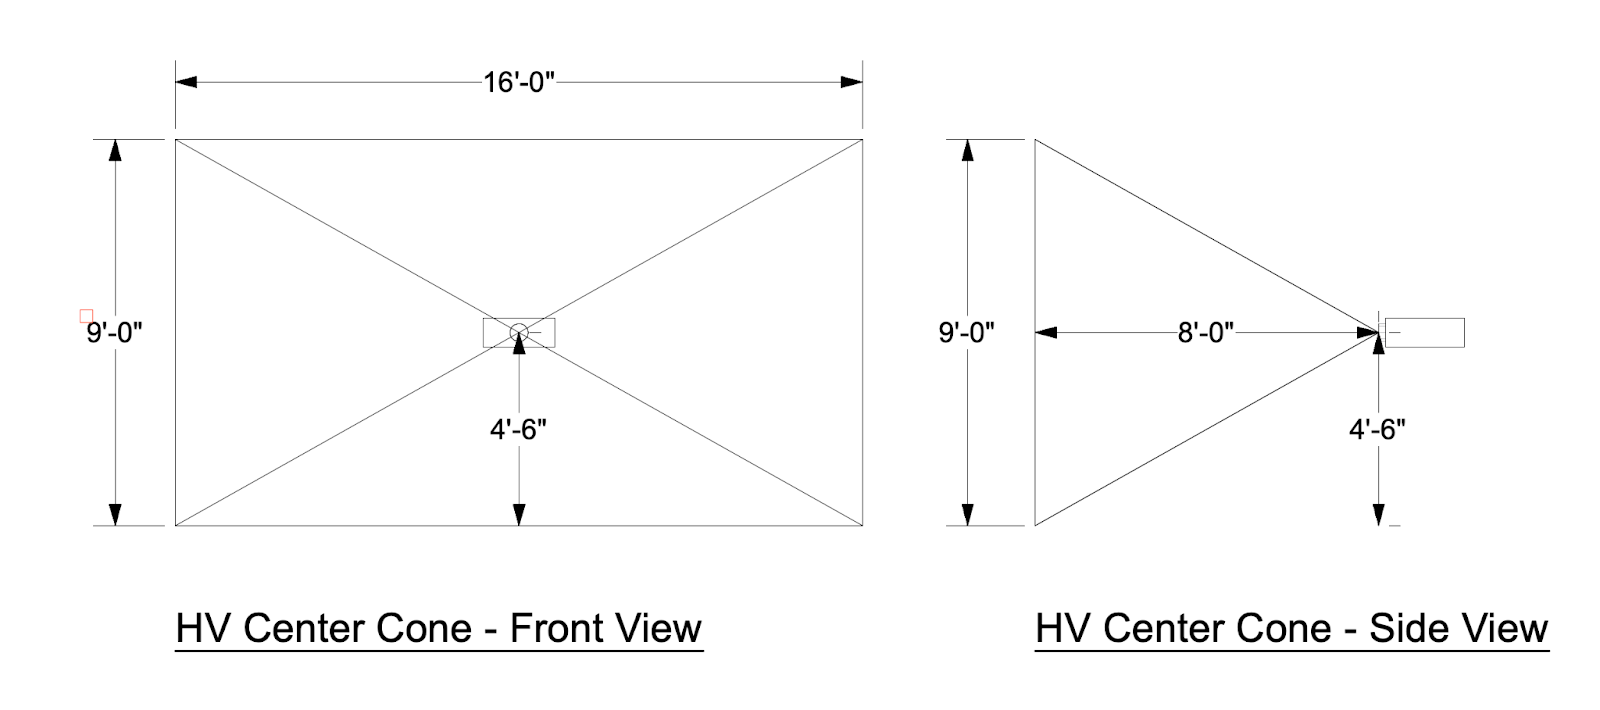
My throw ratio for this lens is .5:1. The lens is a center (red +) cone (without any lens shift, the projector is in the horizontal and vertical center of an image when projected on a flat surface). My ideal coverage is 16’ wide by 9’ tall. To get the distance away from the surface to the projector lens, I can multiply the target width 16’ by the throw ratio of .5. This tells me the lens distance away is 8’. If you’re just looking to get basic info, this is all you really need to do. If you need exact projector positioning or whether or not the projector fits into a specific space, then you can make a frustum in 3D.
In Vectorworks, this is quite simple. You create a rectangle that is your target size and you throw a locus in representing the projector cone. You then select both things, and select Model→Multiple Extrude and extrude by your lens distance. With the extrude dialog present on your screen, you put in your throw distance.
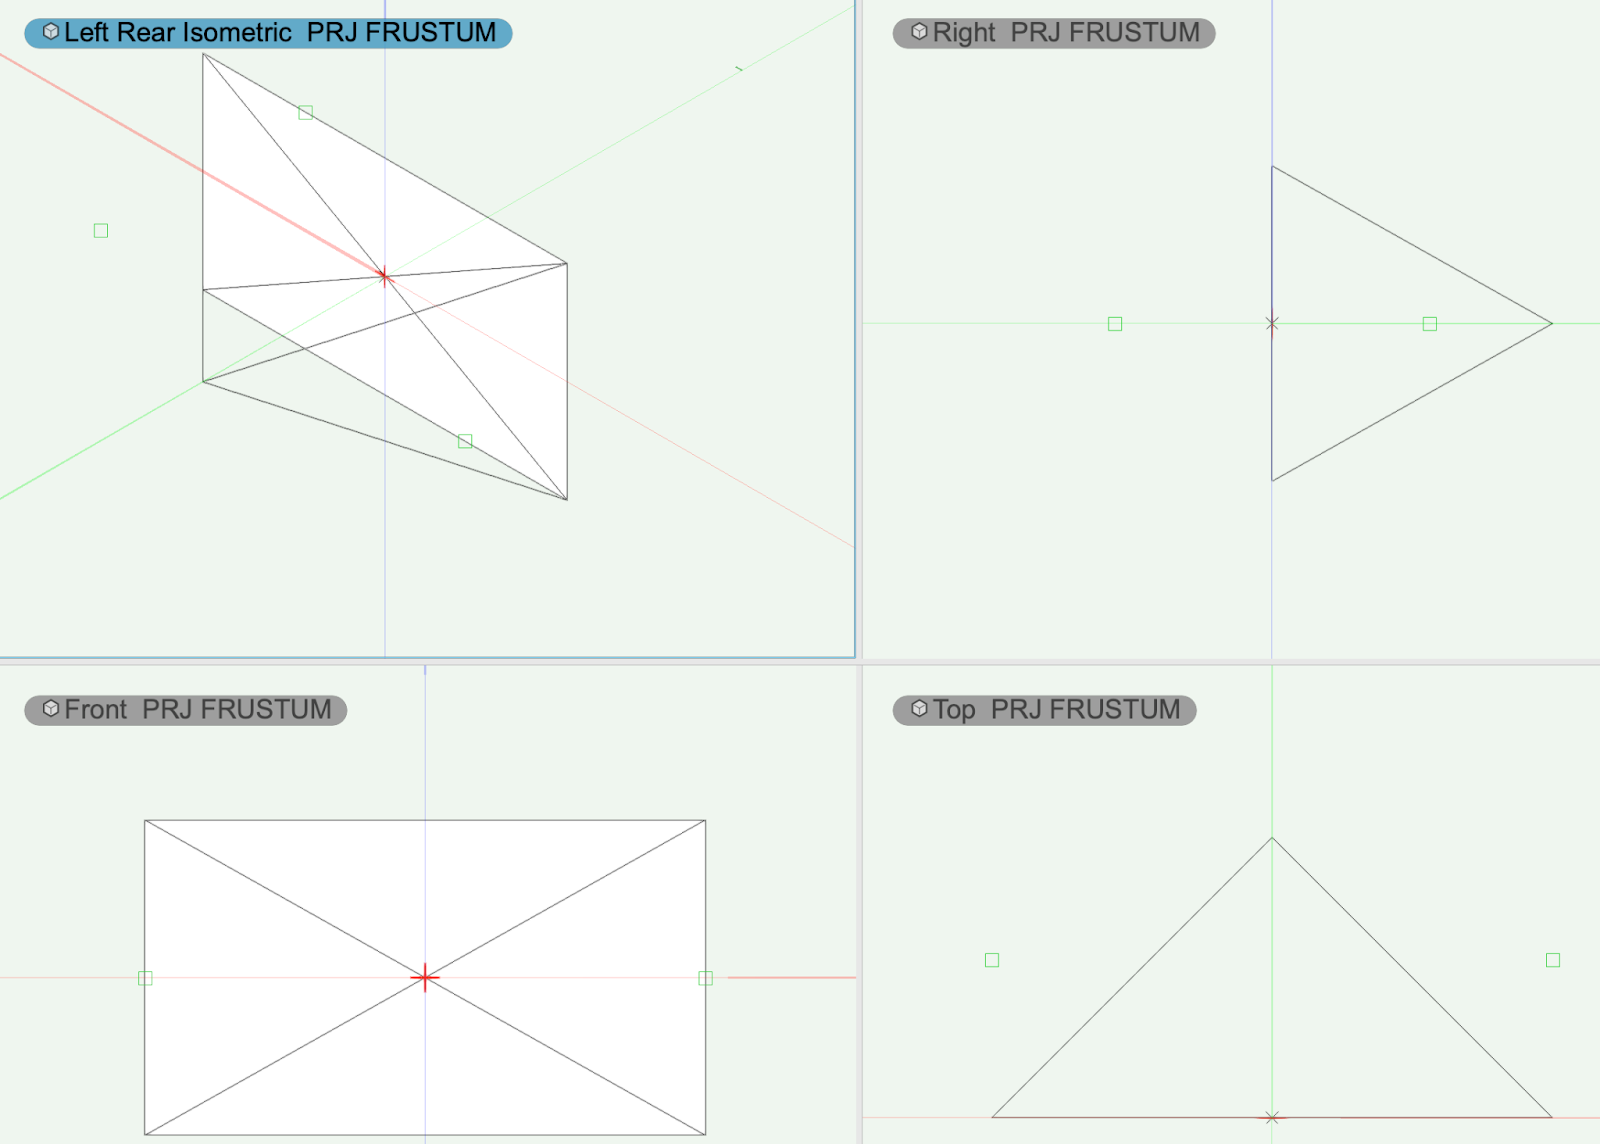
Earlier, I had said “or sample coverage.” By that I mean, if you know your frustum, but you need to determine your distance, you can use a sample dimension to model the 3D frustum, and then extend (or reduce) that model proportionally until you get to your surface (in VWX this extrude option is called “Move Face Mode”). If you’re an After Effects person, working this way is kind of like putting your anchor point at the lens and then extending (or reducing) the length proportionally to the desired distance. This keeps the aspect ratio between the cone center and the image intact!
The other very typical lens cone you might see is one that is aligned to the top or bottom of the image. For this type of lens cone, this is what the frustum looks like.
Projector Math
Disclosure & Overview
In all the eexamples below, using a 1920x1080 projector at 8’ away projecting 16’ wide x 9’ high.
Special shout out here to Sean Leo who hooked me up with some of these.
You need to use projector math for all kinds of things – but mostly for Projector Positioning and engineering.
Throw Ratio Formulas
To get Projector Width = Distance x Throw Ratio
8 x .5 = 16
To get Projector Throw Ratio = Distance / Projector Width
8 / 16 = .5:1
To get Projector Distance = Throw Ratio x Width
.5 x 8 = 16
Diagonal Dimensions
// Based on a single Projector in a blend not the blended resolution
W Width = 16 ft to inches x 12 = 192 ″
H Height = 9 ft to inches x 12 = 108 ″
pxW Pixel Width = 1920//pixel Width = 1920
pxH Pixel Height = 1080//pixel Height = 1080
inW Inches in Width = W//inches Width = 192”
inH Inches in Height = H//inches Height = 108”
//functions
pxD Diagonal Pixels = sqrt (pxW^2 + pxH^2) = 2202.90717
inD Diagonal Inches = sqrt (inW^2 + inH^2) = 220.290717
Pixels Per Inch (PPI)
There are too many ways to calculate PPi. In an array of projectors, you should use values from a single projector, as the values from an array of projectors will give you different PPi for Height than Width (even though they are the same if the projectors are spec’d the same). I don’t really understand why it happens this way.
pxD Pixel Diagonal / inD Inch Diagonal of Screen = 10
Aspect Ratio
The basic “Aspect” is easily calculated. It’s the pxW / pxH: 1920/1080 = 1.7777777778
To get the ratio, that magical little 16:9, you need to find the GCD (greatest common divisor) of pxW and pxH. You can do this by using the GCD function in a spreadsheet: GCD(1920,1080) will return a GCD of 120. To get the aspect, you divide the pxW by that GCD: 1920/120 will return 16. To get your second number, you divide the pxH by that same GCD: 1080/120 will return 9.
// Spreadsheet formula - replace pxH, pxW with the cells that contain those numbers
=SUM(pxW/GCD(pxW,pxH))&":"&SUM(pxH/GCD(pxW,pxH))
Lumens
Foot Lamberts (fL) = (Projector Brightness in Lumens / Area of Screen in SqFt) * Gain
Projector Positioning
Positioning Overview
A projectior’s physical location in a space is specified by someone who understands throw ratio and someone who understands physical limitations of a space. That could be you! In most cases, you can get a rough projector positioning using a generic or brand specific projection calculator. If you have a more complex situation, or you’re the type of person who just likes to make sure, you can calculate this yourself fairly easily.
Understanding Projector Lens Types and Projector Math is critical to understanding where a projector can go. You can learn to draw a frustum to figure out, or you can use formulas on their own, or (my personal recommendation), is a combination of both.
Projector positioning is based on a projector’s frustum, which is the light cone that is emitted from a lens. You can build a frustum in 2D space and do a top view and a side view to manually calculate your projector body position.
I did this in Adobe Illustrator for 10 years before I moved into 3D space. It makes a huge difference. I use Vectorworks, which has a projector tool, but it is limited and working from scratch is a good way to learn anyway.
Projector Fans
All projectors have fans, which means all projectors have clearance requirements. If you put a projector in a box without airflow, you’ll break it. The clearance requirements are mixed, per side, based on the airflow required from the intake fans and outtake fans. It’s usually something weird like 8” from one side, 16” from another, nothing in front (duh), 13” from the back, and 1’ above and below. If you want to be stupid about it, you can also just see what the biggest dimension is and use that for all sides (except the front). This, too, is a good example of RTFM.
Projector Rotation
Many projectors have specifications for how they can be rotated. Some can be tilted up or down a certain amount of degrees. Some can be in both a vertical orientation in addition to a traditional landscape orientation. Some can be rotated 360° in any direction and be just fine.
Technically all projectors will work when you rotate them, but certain projectors aren’t designed to be in non-traditional angles, and doing so will result in burning the lamp out faster, breaking the fans, voiding the warranty. This is a really good example of RTFM.
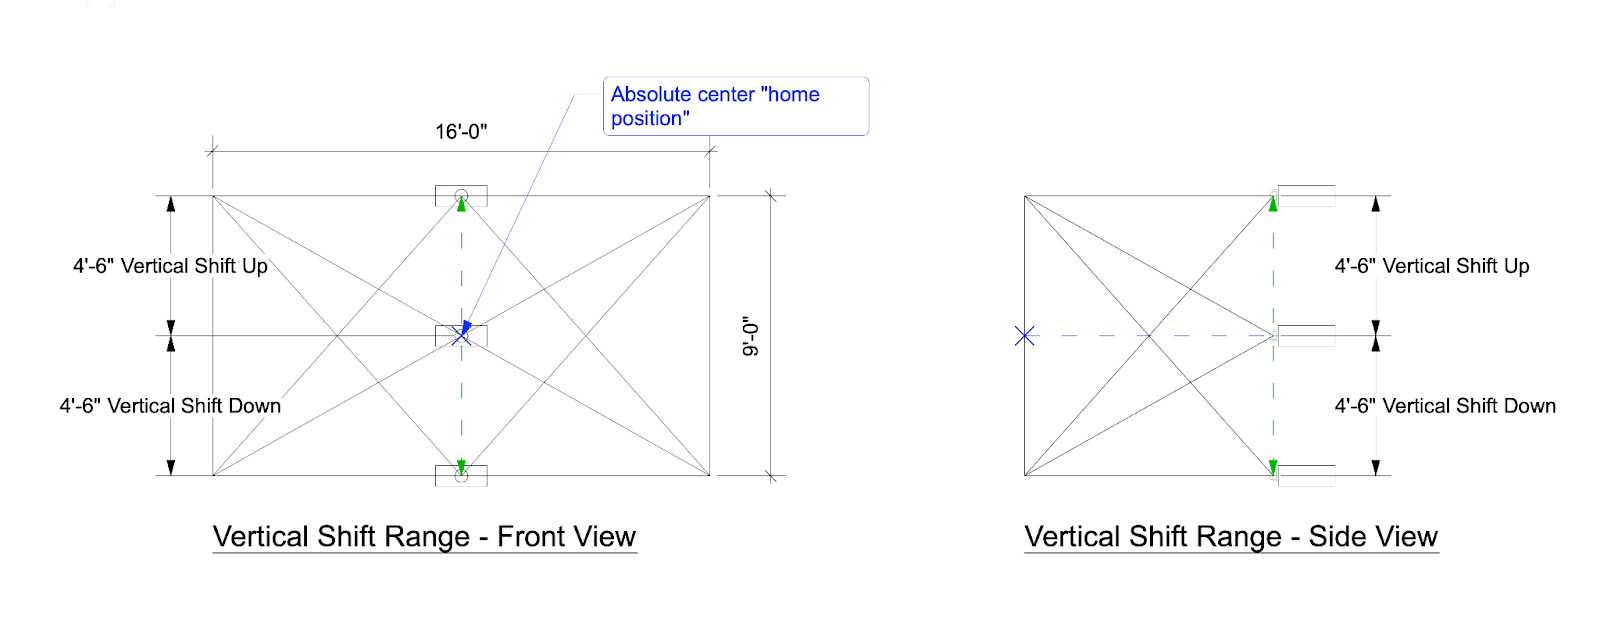
Projector Lens Shift
Calculating projector lens shift if you need the projector to live somewhere outside of the “home position” is very easy. For higher end projectors, the “home position,” where the lens has 0% shift, is usually the top (or bottom) middle, or the absolute center of the projected image. The projector living at the top of the image is usually good for “grid” or ceiling positions. The projector living at the bottom is usually good for floor positions.
Overshooting & Keystoning
If you need to put your projector in a position that the lens cone doesn’t support, you can overshoot and crop your image, or overshoot and keystone your image. These two options cover your target at the expense of both your brightness (fL) and your resolution. A good example of this is installing a home projector. You might install the projector in the ceiling, but there’s no shift on the lens and the lens cone is center aligned. If your projector is far enough away, you’ll tile the projector to hit the screen, and then you can overshoot your target (project slightly bigger than is ideal), and finally, you can keystone.
In the below example, we want to cover the entire 16’x9’ viewing area with our 1.2:1 top-aligned center cone projector, but our projector lens’ center can only live at a height of 1’ above the projection field! What do we do?
Under these requirements, we can achieve coverage with a little fine tuning. A 1.2:1 throw ratio to cover this target means we need to be approximately 19’3” from the surface. If we instead are a few inches further away, say 19’6”, we can place the projector at 1’ above the target field and angle it down a few degrees. It will result in an image that is just slightly trapezoidal (wider at the bottom).
From here, within the projector we can “keystone” the image to correct for the slight trapezoidal visual. We can also achieve this by corner pinning if the projector offers it, corner pinning via a media server, or corner pinning in content (baking). All of these solves will turn it back into a squared rectangle, which is what we want!
Now we’re covering the target correctly.
Basic Positioning Example
If your projector doesn’t have lens shift, then calculating the position of the projector is determined by the throw ratio against your desired coverage and the frustum type. The simplest version of this is a center cone (where the projector is aligned in the center of the image). Where a projector has a center cone, your throw ratio is .5:1, and you’re projecting 16’ wide by 9’ tall, this means that your projector needs to be 8’ from the target surface and 4’6”’ off the ground. This is a good opportunity to mount your projector to a tripod or C-stand!
Projector Rigging & Hardware
Disclosure & Overview
I (Cam) try not to do any projector rigging because I don't want to be liable for anything hung overhead. That said, I've hung many projectors either on my own, with a team, or supervising another vendor. My recommendations here are given with a massive stipulation: proceed at your own risk.
Pro Tips
Always try to install with a buddy and multiple ladders or a lift.
Little projectors are easy to install, and the weight is often low enough that you can even hang them in a drywall ceiling using toggle bolts or strong anchors. I always buy flexible projector mounts rather than fixed position projector mounts – even in a fixed installation environment. I do this because the positioning math that comes from a manufacturer's projection calculator has a margin of error. It's a slim margin typically, but having the flexibility to tilt, pan, and roll is often critical to getting things just right.
Medium sized projectors and greater often need something stronger to safely secure above head.
When you buy rigging hardware, they supply kit for tons of scenarios. Keep the leftover hardware in a bin from your mounts. When you have missing or stripped parts, or you need an extra leg, you’ve got some backup / a treasure chest.
Get security drill bits so you can use your own screwdriver or drill gun. Make sure to turn the torque all the way down and then back up to taste so that you don’t fuck up your projectors. This is an acquired skill. Proceed at your own risk!
Read up on Mastering Projector Reigging @ vidvox.net written by ProjectileObjects for Projectors weighing less than 50 pounds.
How The Hardware Works
Projector mounts come in many shapes and sizes.
In a professional situation, you typically have five main elements:
- A flange or cheeseborough that connects the projector pipe to a wall, ceiling, or another pipe
- A projector pipe that lives between the projector mount and the flange element
- A projector mount – this is where you have tilt, pan, and roll capabilities
- An interface bracket – this is literaly connected directly to the projector (in the tripod metaphor, this is the "plate").
- The projector
There are versions of this where you attach the mount directly to the target surface instead of using a pipe and a flange. There are also versions of this where instead of pipe and flange, you might have threaded rod coming down from unistrut. A good projector mount gives you the ability to do any of those options.
There are also versions of this where elements 3 and 4 are combined into a projector cage.
Projector Cages
When you rent a projector for an event or temporary install, it is likely to come in a projector cage. This is recommended when you are mounting projectors to truss, and for ease of installation. Bigger projectors (typically 15k lumens or brighter), are frequently permanently installed inside of cages.
Cages are great for micro adjustments and ease of installation, but they add a lot of bulk. Good for gird, strut, and truss installations but not typically a good use of space in permanent installations that are in-wall, above ceiling, etc.
Projector Enclosures
Ocassionally, you'll work with a vendor or manufacturer to enclose the projector within a ceiling or wall or to put it outside. Ventilation is critical here. You'll either need to hook it up to building HVAC, or you'll need to build filtered intake, outtake fans and ventilation ports. I recommend working with a company that does this professionally because a wrong move here can void the warranty and kill your projector. If you're in a situation where you are forced to ignore projector manufacturer intake and outtake minimum physical clearances, you need ventilation.
Mount Manufacturers
There are many projector mounts out there. I have found that the two below are the best.
Peerless - they make great mounts for projectors <50 pounds, but they can have QA issues, so order in advance. More than once, I’ve received a mount with missing pieces. Or with all the screws pre-stripped! The mount you want is the PRG-UNV. Buy one extra for parts / return it if all the rest are good. The price is good. Some models are a little finicky with their adjustment wheels. That’s what zip ties are for! The UNV mount is good because it adds a plate that you mount to the tripod that you can slide in or out of the mount attached to a pipe, ceiling, or wall. It's sort of like a quick release plate on a tripod.
Chief (Legrand AV) - they make great mounts for projectors of all sizes and weights. This is my favorite mount company. They have a really good portrait mount that holds projectors up to 75 pounds! Preferred. RPAU is their standard mount. VPAU is their 90°. Their mounts come in black/white/silver. They also sell great pipes, flanges, and solutions for weird situations - like hanging from a drop ceiling. They have a product for that. Pro-Tip from Projectile Objects: you can find these on ebay for $50-100 less than B&H. Not sure if warrantied on resale.
To read more about rigging and projection mount best practices and tools of the trade, read on to Projector Mounting Explainer.
Projector Troubleshooting
Mapping is very difficult!
(Even though my projector covers the whole surface needed to map)
Chances are either your projector angle is too aggressive or the lens has a sharp angle built right in due to its lens offset. Traditional Ultra Short Throw projectors (eg “hammerhead” models) have an intense offset which makes them really hard to map with. Try using lens optics that don’t have a massive offset. Traditional optics: short throw, medium throw, long throw and snorkel lenses may solve your problem. See the sections about Lens Types and offsets.
Projector Black is Aggressive
(The lights are off and your content fades to black and suddenly you see the edge of the projection, or you see plaid across a blended projection field.)
- If you can, try to throw a little bit of ambient light on the projector surface, that works wonders. This is also called “trash light.” A good gaffer or lighting designer can step in and make the pain go away.
- Some projectors have black match capabilities, which is designed to help you match black between projectors, especially helpful in blends. However: you can sometimes use this to match black with the room.
- Hard mattes, baby. My short term memory is pretty bad so I’ve probably already covered this, but: using cardboard, wood, or metal, literally make a physical mask in front of the lens. This is a similar concept that ellipsoidal lights embrace. Make sure to never put this directly on a lens - especially tape. Never use plastic for this. Lenses can get very hot. To feather the edges and turn it into a soft matte, you can play with matte material.
- You can use a dowser when media fades to black which is a triggerable hard matte.
Projector Menus Look Good, But Content is Dark. WTF?
Look for a setting on the projector called something like “dynamic black.” Probably developed by the same psychopath that designed “sports mode” or “dynamic contrast” for televisions to make your content look like 1980s 25FPS BBC programming. Point being: turn this off. Impress your clients when they’re disappointed by the brightness by “fixing” this.
Projector black is bigger than content - am I not using the entire sensor?
- In most cases this means you’re sending a resolution that is slightly lower than the projector’s native resolution. Commonly - it is seen when you’re sending 1080 and the projector’s native is WUXGA (1920x1200).
- You should have your content use the whole chip if you can (not for movies tho, those should always be the film’s native)!
- If you can only send content at 1080 because the plumbing limits you (HDBase is sometimes limited to 1080), you can do a squeeze and de-squeeze method. How that works? Using the WUX example:
- Make your content 1920x1200 where circles look like circles and squares look like squares.
- There’s some discussion about where the squeeze happens but, I like doing it after rendering. So: render your content at WUX.
- Force your display output to 1080.
- The projector will now show your WUX content “squeezed” - circles are ovals, and squares are rectangles.
- To “desqueeze,” set the projector’s aspect setting to “full” or 16:10.
- Yay you’ve got a bit more height to play with.
Projection Surfaces
You can project on almost anything to varying degrees of success. Water? Not so good. Mist? Can be good. A grey wall? Perfect. A black wall? Not so good.
The one hard-and-fast rule is that you can't really project on to a surface that is getting direct sunlight during the day – why? The sun is brighter than the projector.
Projector Paint
I've used all kinds of things. The thing that looks best is Screen Goo IMHO.
The version of Screen Goo I like best is: Screen Goo 2.0,Max contrast (.7 gain)
Have A/B’d against Paint on Screen Projector Screen Paint G005(S1 Screen Plus Silver) (1.4 gain). The difference is marginal, but enough to notice that the Goo looks better. How these compare to just a basic matte grey: also marginal.,
You can blend on the Goo and not worry about brightness changing based on the viewer’s relationship to the screen. If you walked through Penn Station between 2017 and 2020 you would have seen a 2 projector blend using a screen that’s treated with reflective properties in order to increase the projector’s gain, that when standing in the middle of the room, looked good, but when you were offset from the middle, one side of the projection would appear way brighter than the other – making the final projection look like complete shit. It's a miracle it was a live presentation for that long given that I would call it “very bad.” (FYi, a few of us worked with the company who developed this screen material, they’ve since gone out of business, and I think now are getting into edible products… rich people am I right? yikes!).
What else works is : gray paint. A gray that is 75-85% white (or 15-25% black) looks fine 95% of the time. Budget for Screen Goo, then when things get tight, hit up Benjamin Moore. Just make sure you do an eggshell finish! None of that glossy nonsense.
Projector Mounting Explainer
Projector Mounting Overview
Safety note. For all of these options you need to have a back up plan if the mount fails. In most cases that means a safety cable attached from the body of the projector to the grid or solid architecture of the building. Anything that goes over a person’s head requires backup plans in case something fails. Also consider how far the projector could fall and if it would swing.
Pipe Style Mounts
A grid is a permanent structure built in a space and attached to the architecture to support equipment rigging. It is typically schedule 40 pipe but can be a lot of different things. Galleries typically use what is called Unistrut. You can adapt with something like this and still hang from a pipe!
Pipes for projector mounting are typically Schedule 40 1.5” NPT
-
Schedule 40 (describes the thickness of the pipe walls)
-
NPT (describes the threading for screwing the pipe into the mount)
-
1.5” (which does NOT refer to the actual outer diameter, it is the nominal pipe size “nps”, it is actually 1.9”)
-
-
-
Pipes attach with a “cheeseborough”
-


Pipe-based Mounts
-
The primary type of mount we use are made by Chief Mounts
-
Your mount needs to:
-
Support the full weight of the projector and any other possible weight from cables (so overestimate)
-
Reach all the connections points - universal mounts have legs and need to be long enough to reach!
-
Connect to the pipe or other connection point you are using.
-
-
-
But you can use a lot of different brands
-
Projector mounts use metric screws. You can purchase a “VESA” kit to be prepared. Note that projectors don’t use standardized VESA screw positions but do use the same types of screws.
-
Projectors may need spacers! Spacers adapt screw lengths to get around bumps on the body of the projector or make space between the mount and the equipment if there are bolt heads or other things sticking out and in the way.
-

-
Projector mounts generally come in two pieces. The part that attaches to the projector and the part that attaches to the pipe.
How to hang the projector - Best practices
In order:
-
Attach the pipe side of the mount to the pipe.
-
Hang the pipe and check the height (note you are calculating for where the lens is - not the mount so know the vertical size of your projector and mount)
-
Attach a safety cable to the projector before attaching the mount. (it may block the safety cable point)
-
Attach the projector side of the mount to the projector.
-
Bring up the projector and slide the projector side of the mount on to the pipe side of the mount. Tighten all screws.
-
Attach the safety cable to the grid/truss.
-
Tighten and check everything but NOT TOO TIGHT
-
Projector side of the mount installed on a projector.
-
Pipe side receiver. Note: these are not matching mount pieces, just examples of the different types.


-
How to install video. For the “VPAU” model.
-
Manual as a pdf
-
Projector Cages
Panasonic Projectors can fit in the EVO P10 projector cages. These are ideal for floor projection as they can be mounted vertically and they support more weight than other non-cage type vertical mounts. They also allow easier access to adjust the projector position after mounting. They require specific clamps made specifically for these frames to attach them to the grid.


Truss
Truss is used as a portable system for hanging equipment in temporary setups. It has an outer diameter of 2”.

-
Great video that goes through all the clamps and how to hang them on truss.
-
You can adapt pipe mounts to truss.
-
Manual for the truss pipe adapter.
Clamps
-
J Clamp - https://currentprice.io/j_clamp
-
C Clamp - https://currentprice.io/c_clamp
-
Global Truss Half Clamp - https://currentprice.io/mini_360
-
Trigger Clamp - https://currentprice.io/triggerclamp
-
Yoke Adapter - https://currentprice.io/yoke_adapter
-
Half Clamp To Baby Mount (for Yoke Adapter) - https://geni.us/2cmsb
-
-
3/8 - 20 Bolt for Super Clamp - https://currentprice.io/spigot_stud
-
Manfrotto Super Clamp - https://currentprice.io/super_clamp
Plywood options
If you don’t own a mount you can often use plywood and drill holes to accommodate the mounting points or make a shelf or create an adapter if you don’t have a pipe based grid to hang from.
Important things to consider:
-
Plywood Thickness & Type – Thicker plywood can support more weight. Marine-grade and structural plywood are stronger than softwood plywood.
-
Bolt Size & Type – A larger diameter bolt with a washer distributes force better, reducing the risk of tearing through the plywood.
-
Bolt Placement – Bolts near the edges of the plywood are weaker than those placed more centrally.
-
Washers & Backing Plates – Using washers or metal plates prevents bolts from pulling through the plywood.
-
Load Type – A static load (steady weight) is easier to support than a dynamic load (swinging or shifting).
-
Support Behind the Plywood – If the plywood is backed by a wall or frame, it improves strength.
Plywood Thickness Estimated Load per Bolt (Static Load, with Washer)
-
1/4" (6mm) ~10-20 lbs
-
3/8" (9mm) ~20-40 lbs
-
1/2" (12mm) ~50-75 lbs
-
3/4" (19mm) ~100-150 lbs
-
1" (25mm) ~150-250 lbs
Shelf Options
Shelves are often used when projector positions are static and not likely to move in a space. These can be purchased but are rather simple to make.
Considerations:
-
Weight capacity
-
How is the shelf attached to the architecture?
-
Are the projector’s fans clear and able to cool the projector?
-
Is there room around the projector to allow for cable attachments?
-
Is the projector securely attached? Or could it move/fall?
Examples:


Projector Stands - Floor Mounted
There are many purpose built stands but even more repurposed stands.
Speaker & tray stand style:

Purpose built portable table style by Da-Lite

C-Stand style mounts

Projector Plates for Truss

Monitors

VESA Standards - Monitors only
VESA stands for Video Electronics Standards Association - and they set a lot of standards, primarily we talk about them in regards to monitor mounting points. In the photo above a custom VESA mount is shown that was machined to allow for ALL VESA connections.